Posted on 4 Comments

How to select the right needle for the job

A bad workman always blames his tools.

We’ve all heard it… and it’s very true indeed. But let’s face it, using the correct tools does help a tad, does it not.

I don’t know about you, but I think I’d struggle a bit to try and cross-stitch with a sewing-machine needle or a curved mattress needle… So yes, tools do matter.


What if I told you the reason you’re having such a hard time stitching French knots COULD be because you’re trying to stitch them with the wrong needle, rather than your skills being at fault…?

Ah-hah! That’s an interesting concept, isn’t it. I think so too.


Let’s talk needles, then:

Tapestry needles:

They’re the needles we normally use for cross-stitch. They have a long eye and a blunt tip.

They also have an eye that’s a bit wider than the shaft of the needle. That means they push the weave of the fabric apart as they stitch through it, which is very useful for cross-stitch, backstitch and most special stitches, but not so good when trying to push them through a very thin/tight space, as their eye tends to get stuck.

Can you see where I’m going yet? French knots & Bullion stitches are both stitches which require the needle to go through a tight coil of thread, and that’s just very tricky to achieve with a large eyed needle… A bit like trying to drive a monstrous articulated lorry through a British back alley!

And that’s why we need:

Milliner needles:

They have a small roundish eye and a sharp tip.

More importantly, the eye of the needle is not much bigger than its shaft (which means the needle is much easier to push through any coil of thread). They are also longer than tapestry needles (which gives us more space to wrap the thread around the needle). Those two features make them ideal for stitches such as French knots and Bullion stitches.

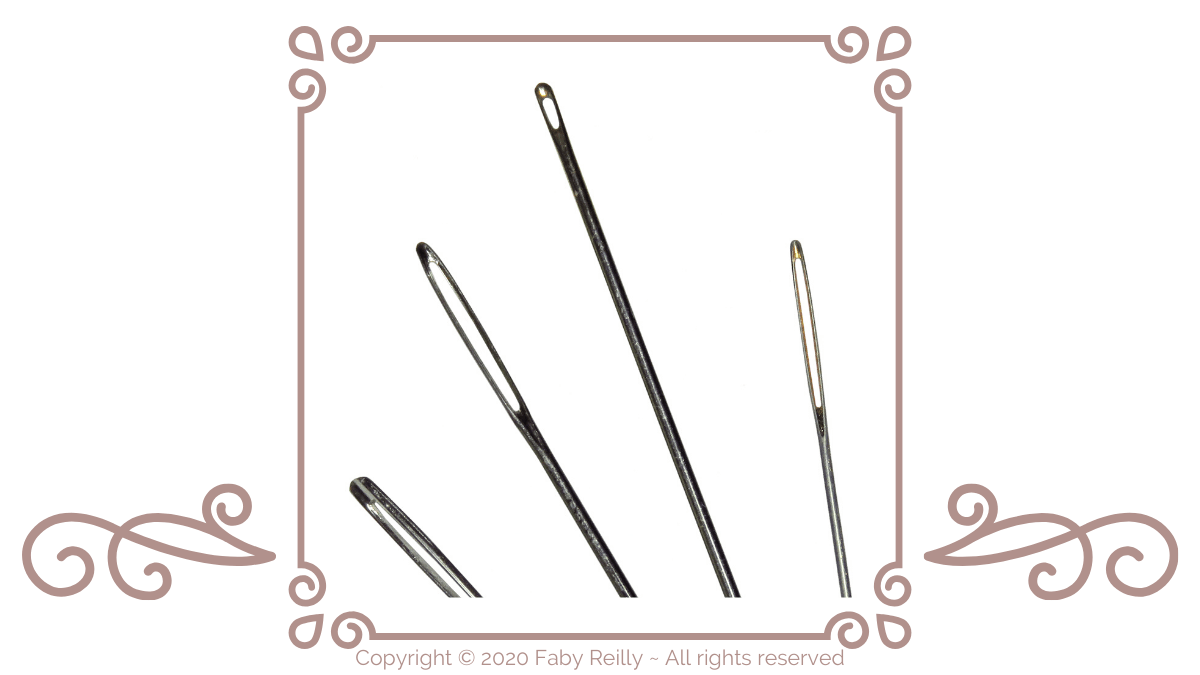
Here they both are, side-by-side, so that you can see the difference clearly:

Shall we recap?

  • Tapestry needles: use them for all types of cross-stitch, backstitch, and most special stitches.
  • Milliner needles: use them for French knots and Bullion stitches (and mind you don’t prick your fingers – they can be vicious!)

Happy stitching!

Faby xx
Posted on 2 Comments

Stitching on a budget?

Stitching on a budget

2020… Reinventing life… Getting used to a new normal… Thinking outside the box (while stuck inside the house!! Oh, the irony of it…)

Stitching is a perfect way to take our mind off the daily worries, to de-stress, and to feel good about being stuck indoors.

GOOD NEWS: no amount of panic buying PDF Patterns will ever create a shortage for other stitchers, so it’s a great guilt-free way to keep your mental health in good shape!

But the problem with having “more time” on our hands is that the direct consequence is usually having “less money”…

Patterns on a budget?

MORE GOOD NEWS: here are 2 discount codes for you.

(valid until 30th April 2020 17th May 2020)

SOLO10 : 10% off any order (valid on all my patterns until 30th April 2020 - cannot be used in conjunction with other coupons, but can be used multiple times.)
 SOLO20 : 20% off orders of £10 and over (valid on all my patterns except Bundle Offers. Valid until 30th April 2020 - cannot be used in conjunction with other coupons, but can be used multiple times. )

I also have a few free patterns on my website, as well as free minis on my blog. Enjoy 🙂

But if you’re on a budget, the patterns are going to be the least of your worries as they’re the cheapest part of any project… Threads and fabric, on the other hand, not so easy… So…

Threads on a budget?

You’ll find cheap threads online of course, but I really wouldn’t recommend them. Assuming they’re not knock-off copies (some of them are very dubious, to say the least), they’re likely to be of very poor quality and snap, knot up, run when you wash them, etc. Most of them are bad news, so I would only recommend using proper branded threads that you know you can trust. Anything else is a false economy (in my humble opinion).

So how to save on threads, then? Here are a few ideas:

As a general rule:
  • Keep any threads left from previous kits/projects. Save them on their thread card so they don’t get mixed up, and if you don’t have a thread card for them, just punch holes in a piece of paper – that’ll do.
  • Adapt patterns if you don’t have the right colours – I can’t speak for patterns from other designers, but for my patterns, you can adapt the colours in the vast majority of cases. If a pattern calls for 3 pinks, but not the ones you have in your stash, use your own! Make sure you make a note of your colour changes (so you don’t get confused half way through the stitching), and also make sure that your colours respect the gradient called for by the pattern (dark/medium/light). Test, and see what you think. Trial and error can be fun! So don’t hesitate to dig out those left-over threads from old kits/projects, and see if you can’t re-use some of the shades.
  • Mix threads to make them last longer – you have small quantities of 2 colours which are close together, but you’re not sure you have enough of each to stitch a full pattern? Combine them and use 1 thread of each colour – you’ll have twice as much of that new mixed shade!
While you’re stitching:
  • Use the loop method if you’re stitching in 2 strands. It saves thread (and hassle)!
  • Save all bits of thread unless they’re shorter than 5cm (2″) – when you’ve finished an area and you cut the thread, save it. It’ll come in handy when you have to stitch these little clusters of stitches which are away from the rest on the pattern. If you only need a tiny bit, why not split the 2 strands, and double them up individually to save even more thread!
  • Be “stitch-aware” – there are several stitching methods, and they each have pros and cons. Some of them use more thread than others, so if you’re trying to lower your thread consumption, keep away from the parking method, for instance.
  • Be “stitch-efficient” – now’s not the time to be a cross stitch purist. Look at the pattern, and determine which is the shortest path to cover:
    • If jumping from one area to the next uses less thread than tucking, cutting and starting up again, then jump from one area to the next.
    • If you’re stitching a row to the right, and then you have to stitch a row to the left, don’t jump to the left handside of the new row, stitch it from the centre, in reverse. As long as the stitches are all lying in the same direction, it won’t show, and you’ll have saved on thread.
    • When you’re stitching backstitch, use the alternate method: instead of looping backwards as you normally would, alternate backstitch/straight stitch/backstitch/straight stitch etc. It will show as a dashed line on the back because it uses much less thread!

Fabric on a budget?

That’s a tricky one to get around. On the up side, using “cheap” fabric is MUCH safer than using “cheap” threads.

  • Be less demanding on quality – I always recommend Zweigart fabric because it’s such a wonderful fabric to work with – it never fails to deliver top a quality stitching experience. But if you have to take a temporary “holiday” from it, don’t hesitate to go for a cheaper fabric while you’re trying to keep costs low. It’ll be less pleasant to stitch, but if it means you CAN stitch, it’s got to be worth it.
  • Think outside the box, and look at ALL the fabrics you have at hand. Not just the ones in your stash, look further out. You know those tea towels Aunt Bessie gave you as a wedding gift? They’re still crisp in their wrapping paper? They’re great to stitch on!! As long as the weave of the fabric isn’t too tight, you can stitch it!!
  • Try your hand at special stitches. Traditionnal embroidery doesn’t have to be scary, and you can literally stitch ANY fabric using traditional embroidery. Even your old denim jacket!! Have a look at my Special Stitches Tutorials – you’ll pick up loads of new techniques that you can use free-hand on fabrics which aren’t cross-stitch friendly, like the decorative band of a hand towel, or the back pockets of your favourite jeans!

No matter what, have fun, and happy stitching !!

Faby xx

Posted on Leave a comment

How to cut linen in a straight line

Cutting Straight Line Tutorial Header - Faby Reilly Designs

If you’re finding that you go cross-eyed when you try to cut a straight line through your linen, then this is a great tip to help you get there without any headache or accidents ðŸ˜‰

You’ll just need:

  • a pair of scissors (I know I’m stating the obvious, but it’s just easier to have them at hand from the start!)
  • pair of tweezers (yep, that’s right!)

Ready?

1 Count exactly where you need to cut your linen, and identify the next strand of linen. Firmly grab it with your tweezers, and gently pull it out. (You may need to crinkle the linen to do that, if it’s a large piece of stitching)

Cutting a straight line Tutorial

2 Repeat this on all the sides you need to trim. A line will appear where you need to cut the linen:

Cutting a straight line Tutorial

3 You can now cut it with confidence, following the clearly defined path 🙂

Add New Post ‹ Faby Reilly Designs — WordPress

A few design ideas you may like, for which this method works really well:

Posted on Leave a comment

How to iron your stitching, when it’s embellished with beads

Ironing Embellishments Tutorial - Faby Reilly Designs

Beads are soooo pretty ♥, but when it comes to ironing your stitching, they can turn quite ugly and spoil the effect if you don’t go about it carefully. Here’s how to keep your beads perfectly upright 🙂

You’ll need:

  • a clean towel (the nice and fluffy type, preferably white, unless you’re sure it’s colourfast)
  • a clean spray bottle, filled with tap water (don’t use scented ironing water, as it may leave residues or stain over time)

Ready?

1. Place your fluffy towel flat on the ironing board, then place your stitched work face down on the towel:

2. Gently spray some water on the back of the stitched fabric – just enough to relax the linen flat (you’ll see it flop). No need to get it too wet, unless it’s really very badly creased.

3. Now iron the back of the stitched fabric, with a bit of steam on a gentle heat (the wool setting is perfect), without pressing too hard on the iron. Let the weight of the iron do the trick and just glide it over the whole area.

4. As soon as you’ve got all the creases out, turn your stitched fabric over so the right side is showing, and reposition any beads that may have moved, then leave it flat to cool and dry. (It if wasn’t too wet in the first place, it shouldn’t take more than a couple of minutes.)

As it dries out, the linen will stiffen up again, and the beads will stay nice and upright 🙂 !


A few design ideas you may like, for which this method works really well:

Posted on 2 Comments

How to sew on the centrepiece of a biscornu

Biscornu Centrepiece Tutorial Header - Faby Reilly Designs

Have you ever sewn a crystal or a button in the centre of a biscornu…? If so, then chances are you’ve experienced the frustration of 2 hands being insufficient to pinch the biscornu down AND stitch the centrepiece on tight enough! Here’s a way to do achieve this, easy peasy lemon squeezy style 🙂

You know what I mean: you squeeze the nicely stuffed biscornu in the centre, and as you get to stitch the crystals together, you HAVE to let go sooner or later to thread a crystal on, and pfffffffew the wretched thing puffs itself up again! It’s a battle of wills. And I don’t do sweating over a battle of wills against a biscornu: somehow, it doesn’t sound very heroic, does it!

So here’s a way to do it, without breaking a sweat 😉

1. You need a biscornu, a couple of crystals (buttons, or any other decoration you wish to use), and some polyester thread as stranded cotton isn’t strong enough for this job:

biscornu-centrepiece-01

2. On one side of the biscornu, find the centre. Use the loop method to attach the thread over a good few strands of fabric (if all the pressure is on a couple of strands only, they risk tearing):

biscornu-centrepiece-02

3. Pinch the biscornu in the centre with one hand, and stitch through to the other side with the other hand (keep going back and forth a good 3 or 4 times) WITHOUT using the crystals! Make sure the hollow is nice and deep. Then still holding the biscornu with your left hand (or right hand if you’re left-handed), give it a few loop knots to stop the thread from becoming loose again. Now, you can let go!! And don’t worry if it looks a little messy in the centre – we still have to attach the crystals which will hide any imperfection 😉

biscornu-centrepiece-03

4. Now that you’ve so easily won the first battle (what a smug feeling!), you’re ready for round 2: sew on the crystals, one on each side. You don’t even need to sew them on super tight, as the biscornu will retain its shape no matter what, now. You just need to make sure they don’t wobble about. And when you’re done, give the thread a couple of loop knots again, under the crystal, and push the needle out as far as you can, away from the crystal:

biscornu-centrepiece-04

5. Pull the thread, and at the same time, snip it as close to the fabric as possible. Once cut, the thread will spring back into the biscornu and remain out of sight. Perfect!

biscornu-centrepiece-05

[I know, I couldn’t hold the thread AND the scissors AND the camera, so I did have to let go of the thread – but you make sure you pull it tight, though 😉 !! ]

biscornu-centrepiece-06

There, didn’t I tell you? Easy peasy lemon squeezy 😉


A few design ideas you may like, for which this method works really well:

Posted on Leave a comment

How to stitch the outline of a biscornu

Stitch an Outline Tutorial Header - Faby Reilly Designs

If you’re stitching something that has to be assembled biscornu style, and you hate having to count those endless stitches to make sure your square IS STILL a square by the time it’s done, then here’s a really cool trick for you!

That dreaded backstitch outline. Often stitched white on white (some designers just don’t have any consideration for their stitchers, do they 😉 !! Ooops, so sorry… really 😉 !) How are you supposed to see those stitches, never mind count them!? And if you make a mistake at the start, you’ve had it, and you’ve got to do it all over again… Grrrr…  Been there too, don’t worry. I model stitch my own designs 😉 !! You wouldn’t believe how many times I’ve had to start over again. Usually that involves a fair amount of swearing…

So I tried concentrating better… no chance. I did NOT try drawing the grid on the fabric with those funky pens that vanish (my faint heart wouldn’t take it, should those lines fail to fade or should they somehow come back to haunt me…!!). I tried stitching a single strand of contrasting thread every 10 stitches… and decided it was way too much hassle to have to stitch 2 outlines, one of which was going to have to be taken out at the end anyway… what a waste of time! And that’s when it hit me:

WHY ditch the second outline!?

Those graduations are really useful even when you’ve finished stitching and you’re assembling the biscornu (or humbug, or whatever else). Fair enough, we can’t keep a contrasting thread in there, because it’ll show, so you see what I’m getting at? That’s right, a 2-in-1 solution 🙂 You stitch the graduation AND the backstitch outline TOGETHER, on the outside, so it doesn’t show when assembled, and you don’t have to unpick it!!! Winner 🙂 !!

Here is goes:

1. Use the loop method (explained HERE) to start your backstitch line, and begin with a vertical stitch (over 4 strands of fabric). Then stitch 5 normal backstitch stitches:

Outline tutorial

2. Stitch 1 vertical stitch (over 2 strands of fabric). That’s your 5s marker:

Outline tutorial

3. 5 stitches later, stitch another vertical stitch (over 4 strands of fabric), that’s your 10s marker. Etc… You’re basically stitching a ruler 🙂

Outline tutorial

4. And you keep going until you’ve finished the outline!! To stop the backstitch outline, you can use the method explained HERE.

Outline tutorial

Those graduations will be there the whole time to help you assemble the biscornu (quite useful when you have to find the EXACT middle of one of the sides 😉 !!!), and they’ll be hidden inside the hems, once assembled.


A few design ideas you may like, for which this outline method works really well:

Posted on 3 Comments

How to stop a lone stitch

Stop a Stitch Tutorial Header - Faby Reilly Designs

If you’ve ever had to stitch a pesky stitch that stands like a Billy No-Mates in the middle of nowhere, you’ll know how tricky it is to start and stop it, without having anywhere to anchor your thread to.

Here’s a quick and easy way to do it 😉

Meet the culprit:

Stop a stitch Tutorial - Faby Reilly Designs

1. You want to start it using the loop method (explained HERE), that way there’s no mess on the back of your work. And if you’ve done it right, it should look like this (from the back):

Stop a stitch Tutorial - Faby Reilly Designs

Pretty neat, isn’t it?

2. Now to finish it. So we’re staying on the back of the work. Push the needle through the back of the stitch:

Stop a stitch Tutorial - Faby Reilly Designs

3. Pull it, until you get a little loop, and then push the needle through the loop.

Stop a stitch Tutorial - Faby Reilly Designs

4. That’s going to create a little knot. Pull it tight.

Stop a stitch Tutorial - Faby Reilly Designs

5. And do the same again, so that you have 2 knots. Pull them tight.

Stop a stitch Tutorial - Faby Reilly Designs

6. Then simply push the needle through the back of the knots again.

Stop a stitch Tutorial - Faby Reilly Designs

7. And snip the thread off. (I haven’t cut it too close here, so that you can see where it’s snipped, but you don’t have to leave it so long 😉 !)

Stop a stitch Tutorial - Faby Reilly Designs

And the best thing is…♥… it works with anything! You can use this method to stop a line of backstitch, and I even use it at the back of each bead I stitch, to make sure it doesn’t become loose and start drooping.

Posted on 2 Comments

The Loop Method

Loop Method Tutorial Header - Faby Reilly Designs

If you have to stitch with 2 strands of cotton and you want to start a new thread without it showing at all, you need to try the loop method!

You know when you’ve got to stitch 1 stitch in the middle of nowhere, or you’ve got to start a backstitch line, but there are no other stitches nearby under which you can tuck your new thread… Tricky, right?

I know, I know, some of you are thinking “well, you just tie a knot and be done with it!” and you’re right, there’s nothing stopping you… but, erm, it does creates that little lump… and you see, I like my work to look neat, but WITHOUT too much effort in the process. As far as I’m concerned, knots = not quite neat enough, and faffing trying to attach the first stitch without it showing = way too much effort.

That’s why I ♥ the loop method so much:

1. Cut a length of thread, and double it up to create a loop at one end, then thread it through the needle at the other end:

The Loop Method

2. Stitch the first stitch (push the needle up through the fabric, then back down again) making sure the loop stays on the back. The wrong side of the work should look like this:

The Loop Method

3. Thread the needle through the loop:

The Loop Method

4. Now you can tighten the thread, and start stitching the second stitch by pushing the needle through to the right side of the fabric 🙂 So simple and totally invisible!!

The Loop Method

It also works beautifully to start a speciality stitch, or to start a whipstitch seam when putting a biscornu together, for instance.

To stop the stitch, check out my tutorial HERE.

Posted on 2 Comments

How to apply interfacing… without risking your iron’s life!

Interfacing Tutorial Header - Faby Reilly Designs

If you want to apply fusible interfacing with complete piece of mind, you need to use baking paper. Yep, that’s right. Baking paper.

Have you ever seen what the sole of an iron looks like if it’s been accidentally applied to the WRONG side of the interfacing sheet…? Well, you don’t want to, honestly. You either have to spend hours cleaning your iron, or you transfer glue onto all your clothes for the following month, … or you give up and buy a new one (eeek…!)

Accidents happen, right? Can you really be 100% sure you’ll NEVER be distracted by a phone call, or a text, or a “is tea ready yet?”… and that you’ll NEVER place the interfacing glue-side up…? I’m not.

So there you have it. Baking paper is your friend. It withstands LOTS of heat, so it’ll cope with your iron, and if EVER the worst happens and you place the interfacing the wrong way up, the baking paper will be happy to take the rap for it (it’s much cheaper to replace than an iron!!!)

1. Layer the stitched fabric (wrong side up), the interfacing (sticky side down), and last but not least the baking paper:

Interfacing

2. Iron the baking paper, then gently peel it off:

Interfacing

And you know what, even if you’re always careful, and NEVER get the sides mixed up… it’s STILL a great idea to use baking paper: there’s often a tiny amount of glue that bleeds past the edges of the interfacing… only a tiny amount, but enough to make your iron irritably sticky for a short while!

Extra tip, because I ♥ you:

If you use the same baking sheet more than once (only if it’s not been in a wrong-side accident, OK?), write something silly like “iron side” in one corner of the side that’s never been in contact with the interfacing, otherwise you’ll contaminate your iron with the glue bleeds from the previous time you used the baking sheet!

Interfacing

And now: ready, steady, apply stress-free interfacing!


A few design ideas you may like, for which this outline method works really well: