Posted on 1 Comment

What can I see on my Bon Voyage Mini Suitcase…?

Picture of the stitched model for the Bon Voyage Mini Suitcase by Faby Reilly Designs

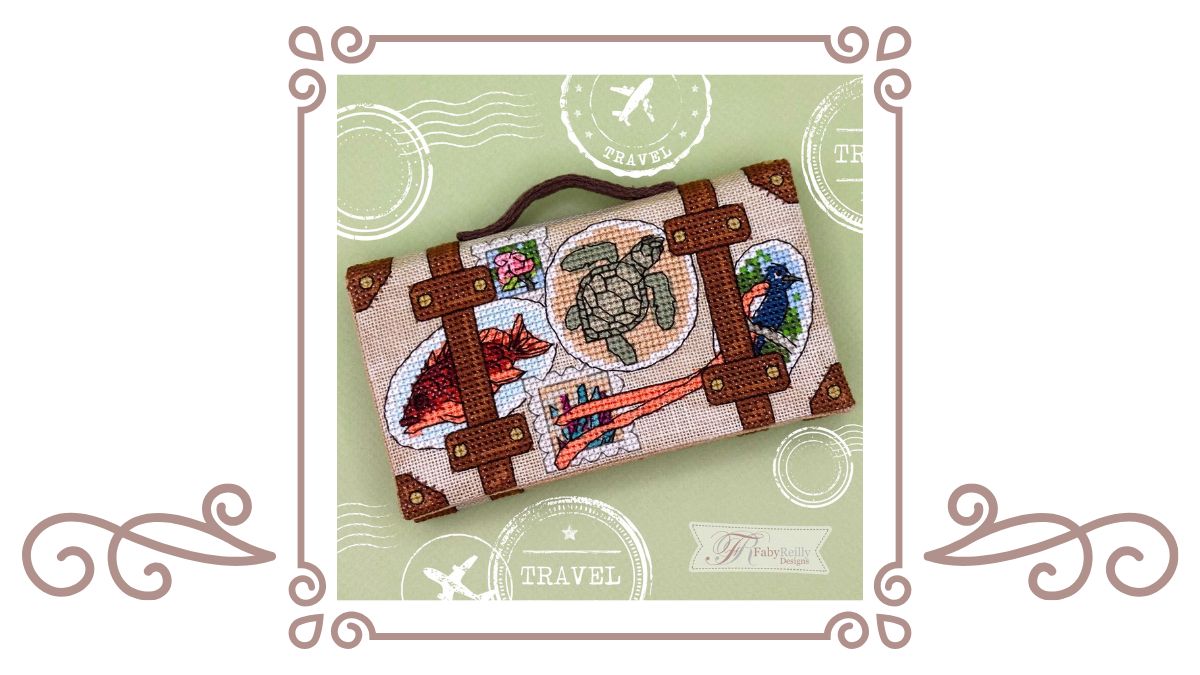
You’re about to start stitching the Bon Voyage Mini Suitcase, but there are so many mini motifs on this design… Can you identify them all? Some are easy to tell, others, not so much… Let’s start with the front of the mini suitcase:

Baby Green Turtle - Bon Voyage Suitcase - Faby Reilly Designs

The BABY GREEN TURTLE – those little guys hatch at night, in their sand pit, and they run all the way across the beach and into the sea as fast as they can, so that they don’t get caught by oggling birds of prey! They’re so cute, but it’s a really tough life being a baby turtle…

Another easy one to recognise is the RED CARP.

What a magnificient fish!! It lives in rocky deeps and its colour is so vibrant… It’s also a great favourite in tropical cuisine.

Red Carp - Bon Voyage Suitcase - Faby Reilly Designs
Crown of thorns - Bon Voyage Suitcase - Faby Reilly Designs

Now it’s getting a little trickier: here’s a CROWN OF THORNS (euphorbia milii).

Its beautiful head of vibrant flowers is mounted on a thick stem covered in large thorns (hence its name). It’s a stunning plant, but don’t get too close: it’s a little antisocial!

Can you believe this bird!? Unless you’ve seen one with your own eyes, and even then… it looks like it can’t possibly be a real bird…! But it does exist and it’s an AFRICAN PARADISE FLYCATCHER (terpsiphone paradisi).

Do look it up to find photographs – its tail is absolutely incredible!

Paradise Flycatcher - Bon Voyage Suitcase - Faby Reilly Designs
Boat Lily - Bon Voyage Suitcase - Faby Reilly Designs

Back to plants with this beautifull BOAT LILY (tradescantia spathacea).

Its leaves are dark green on the inside, almost bluish, and purple on the outside, which gives a most striking effect – although on this design, it’s hiding behind the tail end of the African paradise flycatcher – it’s pretending to be shy!

Let’s turn to the back of the mini suitcase now:

Coconut tree - Bon Voyage Suitcase - Faby Reilly Designs

Not much suspense, here, with this COCONUT TREE on a gorgeous tropical beach. Just a great amount of longing for that warm yet refreshing water !!

And here’s a TRADITIONAL AFRICAN HUT, so distinctive with its red walls of laterite soil and its dried palm roof. It’s amazing that you can still find entire villages of those huts in remotes parts of the tropics…

African hut - Bon Voyage Suitcase - Faby Reilly Designs
Kapok Tree - Bon Voyage Suitcase - Faby Reilly Designs

This is the base of the trunk of a KAPOK TREE (ceiba pentandra).

It’s an absolute giant of the tropical forest – its base is several metres wide!! Its wood is used to craft everyday utensils such as dishes and plates, without fellling the tree. Pieces of wood are just carved out of its massive trunk.

Here’s a fine specimen of SAND FIDDLER CRAB (uca pugilator).

These little guys live in holes on the beach, and you’ll never see them unless you stand absolutely still and make no noise. As soon as they think it safe, they each come out of their own hole to spar each other like mad creatures! They are very distinctive with one tiny pincer and a great big one, which they use relentlessly. Apparently, they fight each other to impress their lady friends 😉

Sand Fiddler Crab - Bon Voyage Suitcase - Faby Reilly Designs
Saddle Billed Stork - Bon Voyage Suitcase - Faby Reilly Designs

Last but not least, here’s a SADDLE BILLED STORK (ephippiorhynchus senegalensis).

A very impressive and large bird – a stunning giant stork with a red, black and yellow beak. This magnificient bird is emblematic of Senegal, but you’ll find him elsewhere in the tropics too.

So, what are you waiting for – have you started stitching your Bon Voyage Mini Suitcase yet ? Grab yours, and post photos of your progress! Tag them #BonVoyageMiniSuitcase for everyone to enjoy looking at them 😊

Happy stitching !

Faby xx
Posted on 2 Comments

Stitching on a budget?

Stitching on a budget

2020… Reinventing life… Getting used to a new normal… Thinking outside the box (while stuck inside the house!! Oh, the irony of it…)

Stitching is a perfect way to take our mind off the daily worries, to de-stress, and to feel good about being stuck indoors.

GOOD NEWS: no amount of panic buying PDF Patterns will ever create a shortage for other stitchers, so it’s a great guilt-free way to keep your mental health in good shape!

But the problem with having “more time” on our hands is that the direct consequence is usually having “less money”…

Patterns on a budget?

MORE GOOD NEWS: here are 2 discount codes for you.

(valid until 30th April 2020 17th May 2020)

SOLO10 : 10% off any order (valid on all my patterns until 30th April 2020 - cannot be used in conjunction with other coupons, but can be used multiple times.)
 SOLO20 : 20% off orders of £10 and over (valid on all my patterns except Bundle Offers. Valid until 30th April 2020 - cannot be used in conjunction with other coupons, but can be used multiple times. )

I also have a few free patterns on my website, as well as free minis on my blog. Enjoy 🙂

But if you’re on a budget, the patterns are going to be the least of your worries as they’re the cheapest part of any project… Threads and fabric, on the other hand, not so easy… So…

Threads on a budget?

You’ll find cheap threads online of course, but I really wouldn’t recommend them. Assuming they’re not knock-off copies (some of them are very dubious, to say the least), they’re likely to be of very poor quality and snap, knot up, run when you wash them, etc. Most of them are bad news, so I would only recommend using proper branded threads that you know you can trust. Anything else is a false economy (in my humble opinion).

So how to save on threads, then? Here are a few ideas:

As a general rule:
  • Keep any threads left from previous kits/projects. Save them on their thread card so they don’t get mixed up, and if you don’t have a thread card for them, just punch holes in a piece of paper – that’ll do.
  • Adapt patterns if you don’t have the right colours – I can’t speak for patterns from other designers, but for my patterns, you can adapt the colours in the vast majority of cases. If a pattern calls for 3 pinks, but not the ones you have in your stash, use your own! Make sure you make a note of your colour changes (so you don’t get confused half way through the stitching), and also make sure that your colours respect the gradient called for by the pattern (dark/medium/light). Test, and see what you think. Trial and error can be fun! So don’t hesitate to dig out those left-over threads from old kits/projects, and see if you can’t re-use some of the shades.
  • Mix threads to make them last longer – you have small quantities of 2 colours which are close together, but you’re not sure you have enough of each to stitch a full pattern? Combine them and use 1 thread of each colour – you’ll have twice as much of that new mixed shade!
While you’re stitching:
  • Use the loop method if you’re stitching in 2 strands. It saves thread (and hassle)!
  • Save all bits of thread unless they’re shorter than 5cm (2″) – when you’ve finished an area and you cut the thread, save it. It’ll come in handy when you have to stitch these little clusters of stitches which are away from the rest on the pattern. If you only need a tiny bit, why not split the 2 strands, and double them up individually to save even more thread!
  • Be “stitch-aware” – there are several stitching methods, and they each have pros and cons. Some of them use more thread than others, so if you’re trying to lower your thread consumption, keep away from the parking method, for instance.
  • Be “stitch-efficient” – now’s not the time to be a cross stitch purist. Look at the pattern, and determine which is the shortest path to cover:
    • If jumping from one area to the next uses less thread than tucking, cutting and starting up again, then jump from one area to the next.
    • If you’re stitching a row to the right, and then you have to stitch a row to the left, don’t jump to the left handside of the new row, stitch it from the centre, in reverse. As long as the stitches are all lying in the same direction, it won’t show, and you’ll have saved on thread.
    • When you’re stitching backstitch, use the alternate method: instead of looping backwards as you normally would, alternate backstitch/straight stitch/backstitch/straight stitch etc. It will show as a dashed line on the back because it uses much less thread!

Fabric on a budget?

That’s a tricky one to get around. On the up side, using “cheap” fabric is MUCH safer than using “cheap” threads.

  • Be less demanding on quality – I always recommend Zweigart fabric because it’s such a wonderful fabric to work with – it never fails to deliver top a quality stitching experience. But if you have to take a temporary “holiday” from it, don’t hesitate to go for a cheaper fabric while you’re trying to keep costs low. It’ll be less pleasant to stitch, but if it means you CAN stitch, it’s got to be worth it.
  • Think outside the box, and look at ALL the fabrics you have at hand. Not just the ones in your stash, look further out. You know those tea towels Aunt Bessie gave you as a wedding gift? They’re still crisp in their wrapping paper? They’re great to stitch on!! As long as the weave of the fabric isn’t too tight, you can stitch it!!
  • Try your hand at special stitches. Traditionnal embroidery doesn’t have to be scary, and you can literally stitch ANY fabric using traditional embroidery. Even your old denim jacket!! Have a look at my Special Stitches Tutorials – you’ll pick up loads of new techniques that you can use free-hand on fabrics which aren’t cross-stitch friendly, like the decorative band of a hand towel, or the back pockets of your favourite jeans!

No matter what, have fun, and happy stitching !!

Faby xx

Posted on Leave a comment

Why stitch on 32ct linen?

32 ct Linen - Faby Reilly Designs

The vast majority of my patterns recommend 32ct linen. That’s a bit like Marmite, I guess: you either love it or you hate it! 

Before I go any further, I must say:

You should NEVER stitch a design on fabric you hate, just because that’s what it says on the pattern… The greatest advantage of stitching from a pattern (rather than a kit) is that YOU get to decide what you stitch with! Feel free to use that power when you feel like it!!

OK, so no need to panic: the point of this article isn’t to force you to accept that 32ct linen is THE solution (thank goodness for that!), it’s just to explain WHY I recommend 32ct linen, and to give you a few tips if you prefer to use a different fabric.


1. linen looks (& feels) better

Haha, I know – it’s very much a personal preference! Don’t worry, you don’t have to agree!

None of my designs are full coverage, and most of them show a lot of fabric in between the motifs. So I like the fabric to complement the design. Personally, I find that:

  • aida is too coarse to the touch, and that the stitches don’t show as well against it as the weave of the fabric is so obvious to the eye. It’s an unecessary visual distraction.
  • evenweave is a vast improvement, but it lacks the lovely sheen of linen.
  • with linen, the weaved threads blend in better, the stitched motifs pop more, and the texture of the fabric gives instant sophistication to the design.

Learn more about these different fabrics HERE


2. the stitch coverage is better on 32ct

That means you can’t see the fabric through the stitches as much as you do on a lower count fabric (learn more about fabric count HERE), and that’s particularly important when stitching with contrasting threads.

What to do if you want good coverage on a lower fabric count?

  • If you’re working on light fabric: increase the number of strands used for the darker colours – so if the pattern calls for 2 strands, try using 3 strands instead.
  • If you’re working on dark fabric: increase the number of strands used for the lighter colours

3. backstitch is easier on linen

I hardly ever use fractional cross-stitch, but I do use a lot of fractional backstitch to achieve the lovely delicate motif outlines in my designs. These are much easier to stitch on linen (or eveweave) than they are on aida.

What to do if you want to stitch fractional backstitch on aida?

  • Be picky when you select your aida. Some brands can be very stiff. Avoid them. Invest in a little hoop to hold your fabric (they’re very cheap) and opt for some soft aida. You’ll find it much easier to poke the needle through a block. If you look closely, you’ll see that each block is made of 4 horizontal strands and 4 vertical strands woven together. You need to poke the needle between the 2 middle strands, either on the side of a block or (rarely, but it can happen) right in the middle of a block.
  • Use a sharp needle. Cross-stitch needles are blunt, which is great for cross-stitch. But if you’re having trouble getting through a block of your aida fabric, a sharp needle will help tremendously!

4. linen makes assembling easier

As already mentioned, aida is quite coarse. Linen is much thinner and bends better, which makes it much easier to assemble biscornus or any other sort of shape. The pointy tip of scissor cases can be particularly tricky to finish neatly on aida. It’s manageable, but it’s not much fun.

Evenweave is better than aida, but it’s more “springy” than linen, which makes it more fidly too. Linen is definitely the nicer fabric (and by a mile), when it comes to the finishing stage.


So that’s why my patterns mostly recommend 32 count linen.

But of course they can be stitched on different fabric. The most important thing is that you enjoy stitching your project – so make some adjustments, and use the fabric of your choice.


Happy stitching!

Faby xx

Posted on 2 Comments

What’s a biscornu?

Blog Question Header - Faby Reilly Designs

I’ve been asked this question so often that it’s high time I should go into a detailed answer rather than just a quick one. But what we all really want to know is what on earth you’re supposed to do with them!

Snowdrop Biscornu

Biscornu” is a funny word, isn’t it. It’s a french word, and it means “which has an irregular, strange shape” (source)

Aaaaah, now it makes more sense 😉 !

Yep, so a biscornu is a little cushion made of 2 stitched squares, like a standard cushion, except that they’re not assembled into a normal square pillow, they’re assembled into a wonky pillow.

To see how that’s done, do read the Biscornu tutorial.

I don’t know who thought this up in the first place (ie. how to make a biscornu out of 2 squares of fabric) but it’s a brilliantly fun idea. To the best of my knowledge, these cute little cushions first appeared in France in 2004, and they went viral in 2008. (source)

What do you mean “but what’s the point of them“?

They’re small & they’re cute, isn’t that enough!? No… I didn’t think so, either. There’s only so many ornaments one can put up with.  Agreed.

So let’s see what we can make with these little biscornus:

1. a plain ornament

Obviously. Still counts, doesn’t it – they can be soooo pretty 🙂

Let it Snow Biscornu

Featured biscornu: Let it Snow Biscornu

2. a pomander

You simply need to fill it with dried lavender.

Lavender Biscornu

Featured biscornu: Lavender Biscornu

3. a pin cushion

Depending on their size, you can use a biscornu as a free-standing pin cushion, or as a scissor fob (to make a tiny pin cushion). Or you can use it teamed up with a thread catcher!

Wild Rose Biscornu as pin cushion Snowdrop Mini Biscornu Scissor Fob Apple Blossom Biscornu with matching thread catcher

Featured biscornus: Wild Rose Biscornu, Snowdrop Scissor Fob (mini biscornu), Apple Blossom Biscornu

4. a wedding ring pillow

I love that idea! The shallow centre is the perfect shape to tie two wedding rings with a pretty ribbon.

Sweet Roses Biscornu White Lily Biscornu Sepia Rose Biscornu

Featured biscornus: Sweet Roses Biscornu, White Lily Biscornu, Sepia Rose Biscornu

5. a paperweight

You simply need to fill them with something heavy enough – Granulex Soft stuffing granules are perfect for the job.

Cornflower Biscornu as paperweight

Featured biscornu: Cornflower Biscornu

6. a towel holder

Especially cool if you can match the biscornu to the towel 🙂

Towel Holder - High Seas Biscornu

Featured biscornu: High Seas Biscornu

7. a necklace

And whyever not? It only works with tiny biscornus, fair enough, but nobody said tiny wasn’t allowed!!

Rose-Chocolat Stitched Jewellery Rose-Chocolat Stitched Jewellery

Featured biscornu: Rose Chocolat Stitched Jewellery

8. a Christmas tree bauble

It’s almost round in shape, so it’s pretty cool to decorate a Christmas tree.

Snowmen Biscornu

Featured biscornu: Snowmen Biscornu

9. a framed picture

Yes, some of them do look really pretty in a frame!! (I do realise it kind of defeats the object of a biscornu, but still, it’s worth mentioning that you can frame them!)

Framed Magnolia Biscornu

Featured biscornu: Magnolia Biscornu

10. a hand warmer

This is a really cool idea brought to us by Kate from Kate’s Threads: fill the biscornu with rice, dried corn (not popcorn!!), flaxseed or any other filling you can heat up in the microware, and it’ll make a fabulous handwarmer! Thanks Kate for this great idea!

Do you have more ideas? Do post them in the comments below 🙂


A few design ideas you may like, for which this method works really well:

Posted on Leave a comment

Can I sell Faby Reilly Designs stitched models…?

Blog Question Header - Faby Reilly Designs

This is a question that I’ve often been asked.

Usually you want to sell my designs for charity events. (Thank you so much to all those of you who have written to me to ask me for permission – I really appreciate it!) In that case, the answer is an easy one to give:as long as you’ve purchased the design (once is enough), I’ve never said no to such requests! I am always delighted that my designs should be used for such a good cause, and I love to hear about what you’re doing.

Now and then, though, I find out that someone is selling my stitched designs… as a business. Without having asked for any kind of permission, of course. As you can imagine, this is not legal and it does not make me a “happy bunny”.

Maybe these people are not aware that it is not OK to do so, and that it is actually quite easy to take a few simple steps, so that they can sell my stitched designs in a LEGAL manner. I cannot speak for other designers, of course: it’s up to each of them what they do and don’t allow with their own designs.

So here’s my policy on the matter:

you will notice in my Terms and Conditions (you can find them at the end of each chart as well as on my website: Terms & Conditions) that my charts are for personal use only and that you can stitch my designs as many times as you want, as long as the finished pieces are not for resale. However, it is a deliberate action on my part to have missed this out from under the “you may not” section. That’s because I do allow resale of stitched models, if certain conditions are met. I like to build respectful working relationships, whenever possible.

These conditions are:

  1. Proof of purchase: the models sold by the seller must have been stitched from designs purchased from my website, OR (if the designs were purchased before we entered into an agreement) a proof of purchase from an approved shop must be provided.
  2. One chart per stitched model: the seller must purchase a chart from my website for each item they stitch. (ie. if they offer 3 stitched models of the same design, they have to purchase the design 3 times from my website. If they later want to stitch and sell more of that same design, they still have to purchase 1 chart per stitched model, etc. When you have a business, not matter how small, it’s a cost that you have to build into your product, just like you would for the fabric, the stranded cotton, embellishments, etc.) It goes without saying that it cannot (under any circumstance) be considered legal to share or resell the PDF chart. We are only talking about stitched models, here.
  3. Crediting: the seller must credit the designs clearly and appropriately: [name of stitched design as published on the chart], designed by Faby Reilly Designs (www.fabyreilly.com), stitched by [name of the seller].

It’s quite straightforward, really, but as always, if anyone has questions of any kind, I’m always MORE THAN HAPPY to answer them 🙂 !! Don’t hesitate to ask!

Happy stitching, everyone!