 Lizzie Wedding Sampler
When you’re only using 1 strand of thread, backstitch is quite forgiving, and you can get away with being a little approximate. Stitching with all 6 strands of thread is a different matter altogether. It looks so pretty when it’s all even, doesn’t it: a chunky row of stitching that really pops out, and gives a new dimension to a design. But the lovely effect is soon spoilt if the stitches are all different sizes. So how do we avoid this pitfall?
Well, it’s quite simple really – you have to look at the pattern and plan ahead of stitching. Think of it as 2 mins of problem solving. It’s good practice for the brain 😉 But before we go into that, here are a couple of “golden rules” to keep in mind:
- GOLDEN RULE N°1: stitches MUST NOT stretch over more than 2 blocks (on the chart).
- GOLDEN RULE N°2: plan gradual changes in length so the difference isn’t obvious to the eye.
- GOLDEN RULE N°3: a diagonal stitch is slightly longer than a vertical or horizontal one.
- GOLDEN RULE Nº4: whatever you do, play it by the book and stitch this backstitch the traditional way. Any alternative way will show, and it won’t be pretty…
So now, let’s see how it’s done. Here’s a mini design we’re going to work on. I tried very hard to include all the possible snags into it, to show you how to deal with them 😉

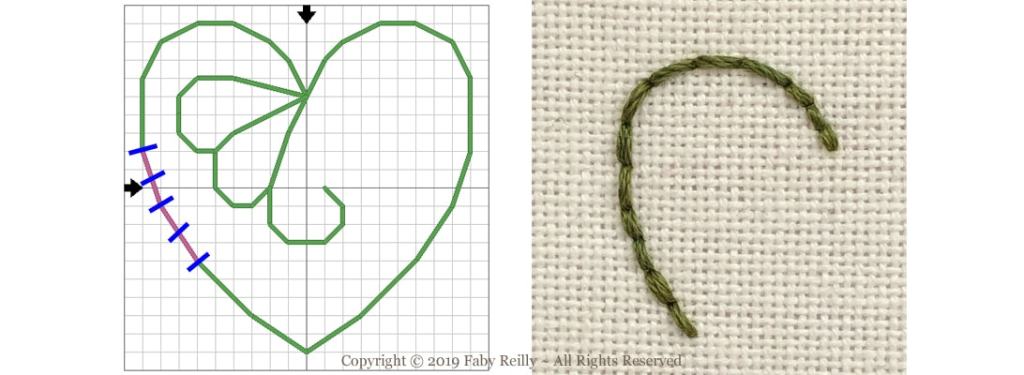
Let’s start with the stitches that are highlighted in pink:

We notice that apart from 1 diagonal stitch, the lines of stitches all stretch over 2 blocks. We could “go long” for each of them except for the diagonal one (each stitch to cover 2 blocks), but that diagonal stitch would then be in the middle of a series of longer stitches, so that may look a bit odd. Also, the first stitch we’ll be working on (in the centre of the heart) is in a rather crowded area, and longer stitches are always a bit wider too… so probably not a great idea here.
So all things considered, it makes more sense to stitch the first few as shorter stitches, and the rest of them as longer ones. This way, we get a gradual increase in length. Are you still with me? It makes more sense with pictures 🙂 (the blue arrow points to the starting point, and the blue lines show where each individual stitch starts and ends):

Now let’s look at the next section (highlighted in pink):

Here, we have 2 options: stitch 4 stitches, or just 2 stitches. We’ve just stitched longer stitches, so 2 stitches it is, to keep to the 2-blocks sort of length (and a quick look at the next few stitches tells us they’re going to have to keep being long, so we’re on the right track:

Next!

Wow! (I hear you say) Those are just too weird! What are we supposed to do with THAT!
Yes, I know…. We are going to have to go cross country 😉 If you’re working on aida, turn on the 4-wheel drive! (ie. switch over to a SHARP needle – it’ll be easier to poke through the aida). If you’re working on linen or evenweave (like me), you’ll be fine with a normal cross-stitching needle.
So, 2 lines here, both weird. The first one spreads over 3 blocks, and the second one – well, it’s even weirder! We’ll get to it in a minute. Line 1: remember golden rule 1? Right, 3 blocks is too many, so we’re going to have to split that into 2 stitches, aren’t we. That means poking a hole in the middle of block 2. Simple (she says!) Line 2: don’t overthink it. It’s a 3×2 (in terms of blocks) rather than a 3×1 (as for line 1), but it’s the same – just a little wider. So same principle, we split it into 2 stitches, and poke right in the middle of that line. For those of you on aida, that’s actually easier than the previous one, because we’re on the edge of a block here!
Are you pleased with yourself yet? So you should be! It’s looking pretty neat, isn’t it? I know yours is as good as mine. We’re doing great! Onto the next section:

Hum, so what do we have here? A row of 3 diagonal blocks to start with. Ah. Simple – just do 3 stitches, right? Well… (golden rule 3) diagonal stitches are longer by nature, so they go well with both short and long stitches… so we could go short stitches and stitch 3 of them, and we definitely would, if we’d just been stitching short stitches. But we haven’t. And remember we need to keep stitch length consistent, so we’re going to go with longer stitches. Not 3 blocks in 1 stitch, though (golden rule 1), so we need to get 2 stitches out of that one line.
The next line is a 3×2 – you’re an expert at these now, aren’t you 😉 No need to re-explain.

Now do the same going back up to the starting point, and then we’ll look at the detail inside the heart:

Ah, another dodgy one. A 4×1 block this time…! But you know the drill by now: that’s right – we split it into 2 stitches!

Next one?

OK. We have a mixture of long and short stitches here. Look at the long lines/stitches – if we stitch them both the same way, we’ll lose continuity: both long, and we have a long/short/long/short series, both short, and we have short stitches coming straight after 2 long ones – cold turkey like that, it’s not good…
So we’re going to adapt 🙂 The first line’s going to be a long stitch (to stay in line with the previous 2), then we have a diagonal stitch which will gently shorten the length, then we’ll carry on with short stitches. Sorted!

Yay! Looking great!! Now we are going to start back from the original starting point. Make sure you tuck the thread under the backstitch on the reverse of the work… With 6 strands, it’ll show on the front if you just cut across:

OK, I think you’re all set now, aren’t you? How would you finish?

That’s right 🙂 Well done!!

Et voilà! Doesn’t it look fab? If you have any question, don’t hesitate to post them in the comments – I’ll be more than happy to respond and clarify this tutorial if needs be 🙂
A few design ideas you may like, for which this method works really well:


What do you think?