 Peacock Stitching Set
 Isn’t it funny how sometimes what seems really obvious isn’t actually that obvious… until it becomes really obvious again! (What…!?) Here’s a perfect example of what I mean…
You’ll just need:
- a small wooden embroidery hoop
- some stitching fabric (linen, evenweave or aida)
Ready?
1. Personally, I don’t like stitching without any kind of frame – it’s much easier to achieve lovely regular stitches if your fabric is kept really nice and taut, and I’m not even talking about beads or French knots! So even if I’m stitching a tiny pattern (like this scissor fob), I prefer to use a frame.
Larger designs are best stitched on oblong frames, but for tiny patterns, small hoops are the best. The downside with hoops is that unless you bind them (& I’ll show you how to do that another time), they tend to leave horrid marks on the fabric, so best to use a hoop that’s only just slightly bigger than your design. Pick it too large, and you’ll waste a lot of fabric. It’s a fine line.

2. So here you go for the obvious:
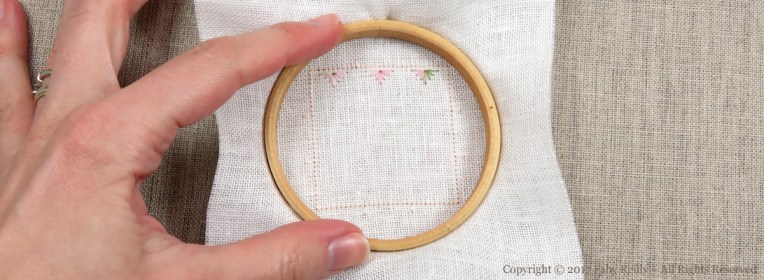
To place your fabric on a wooden embroidery hoop, centre it on the smaller ring, and press the larger ring (having loosened the screw) onto the smaller ring to sandwich the fabric between the 2 rings of the hoop. When you’ve made sure the tension is even everywhere (you can tell it is if the strands of fabric are nice and straight all over), tighten the screw.

3. And you’re good to go…! Start stitching. All is going beautifully well…

4. until… something makes you realise the obvious isn’t actually that obvious! What happens when you go over to the back of your fabric to stop your stitch… and your needle gets stuck against the hoop…!?!? (#Grrr$@&%*! #Rmph$@&%*! and #Argh$@&%*!….)

5. So what now?
Let’s rewind and get back to step 2 to look at the NEW obvious method where you work things upside down!
Centre the fabric over the LARGE ring, and press the SMALL ring into the large ring to sandwich the fabric between the 2 rings. Adjust the tension, tighten the screw. Breathe in, breathe out – life is good again <3 !
6. Look at this… there’s nothing in the way of your lovely needle now, is there 😉 !!

Et voilà !
A few design ideas you may like, for which this method works really well:


2 Responses
Pamela Cambray
Faby you are an inspiration , I look forward to news letters & tutorials best wishes Pamela cambray
Faby Reilly
Oh that’s wonderful to hear, Pamela!! Thank you so much 🙂